
This guide covers Dispatchable Order Messaging for WooCommerce Pro from start to finish. It explains how to install and license the plugin, how to set up your own Meta WhatsApp Cloud API account, how to create and approve message templates, how to turn on automatic order notifications, and how to fix the problems merchants actually run into. It describes version 0.3.0.
What Pro changes: with the free plugin, every WhatsApp message opens pre-filled and someone taps Send. With Pro, when an order reaches a status you’ve chosen (for example, Processing), the message is sent automatically in the background through your own Meta WhatsApp Cloud API account. No one has to open WhatsApp. You can then see whether each message was delivered, read or failed. DispatchWP never sits between your site and Meta, and your messages and customer data don’t pass through our servers.
Plan for setup time. Most of the work happens in Meta’s dashboards, not in the plugin. On a clean run, expect about an hour to collect your Meta credentials. Template approval then takes Meta anywhere from a few hours to a couple of days, and a template can be rejected and need resubmitting. Start the Meta side a day or two before you need automatic messages running.
1. Before you start
On your site
- WordPress 6.6+, WooCommerce 8.2+, PHP 8.1+.
- The free Dispatchable Order Messaging for WooCommerce plugin, installed and active. Pro builds on it and won’t run without it. See the free plugin’s setup guide.
- A public HTTPS address. Meta sends delivery updates to your site over the internet. A local development site, or one behind a password or maintenance mode, can send messages but won’t receive delivery statuses.
On Meta’s side
- A Meta Business portfolio (Business Manager) at business.facebook.com.
- A WhatsApp Business Account (WABA) under that portfolio, with a payment method added. Meta charges for template messages.
- A phone number registered with the WhatsApp Cloud API. Your customers will see messages coming from this number.
- A Meta app (created at developers.facebook.com) that uses WhatsApp.
About costs
Meta bills WhatsApp conversation and template-message fees directly to your own Meta Business account. Your DispatchWP license pays for the plugin and the automation only. It doesn’t include any Meta messaging credit.
2. Installing Pro and activating your license
- Make sure WooCommerce and the free Dispatchable Order Messaging plugin are both active.
- Download the Pro zip file from your purchase email or your DispatchWP account.
- In WordPress, go to Plugins → Add New Plugin → Upload Plugin, choose the zip, click Install Now, then Activate.
- Enter your license key on the activation screen that appears.
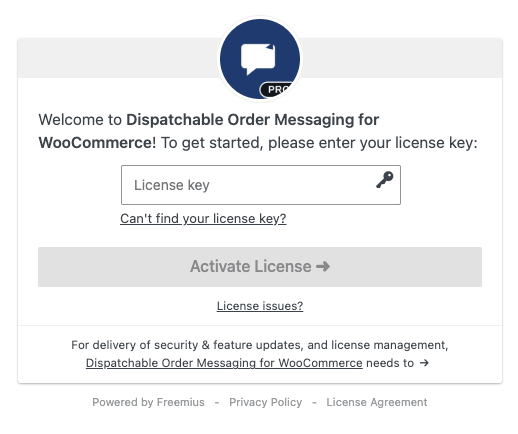
After activation, you land on WooCommerce → Settings → WhatsApp Pro. This tab has two sections: Meta Cloud API and Automated Triggers. A Settings link also appears in Pro’s row on the Plugins screen.
If the free plugin isn’t active, WordPress won’t let you activate Pro. If the free plugin is deactivated later, Pro stops and shows a “Dispatchable Order Messaging for WooCommerce Pro is not running.” notice explaining what’s missing. Automatic sending stays off until the free plugin is active again.
3. Setting up your Meta WhatsApp Cloud API account
This part happens in Meta’s dashboards. Meta changes its screens from time to time, so labels may differ slightly from the screenshots below. The information you’re looking for stays the same.
By the end of this section, you’ll have the five values Pro asks for. Keep them in a safe place as you go:
- Access token, from a System User
- Phone number ID, which is not the phone number itself
- WhatsApp Business Account (WABA) ID
- App ID
- App secret
Step 1: Create a Meta app for WhatsApp
- Go to developers.facebook.com → My Apps and click Create App.
- Choose the WhatsApp use case (Connect on WhatsApp) and link the app to your business portfolio.
- Follow Meta’s setup to connect or create your WhatsApp Business Account and add your business phone number. Meta verifies the number by SMS or voice call.
Meta limits phone-number registration attempts to 10 per number in any 72-hour period. If registration fails, check the number and your code carefully before trying again, rather than retrying quickly.
Also add a payment method to your WhatsApp Business Account. Meta won’t send template messages from an account without one.
Business verification raises your messaging limits but isn’t required to start sending at the lowest tier. You can complete it later.
Step 2: Create a System User and a permanent access token
Don’t use the temporary token shown on the app dashboard’s API Setup page. It expires within a day and your automatic messages would silently stop. Pro needs a System User token that doesn’t expire.
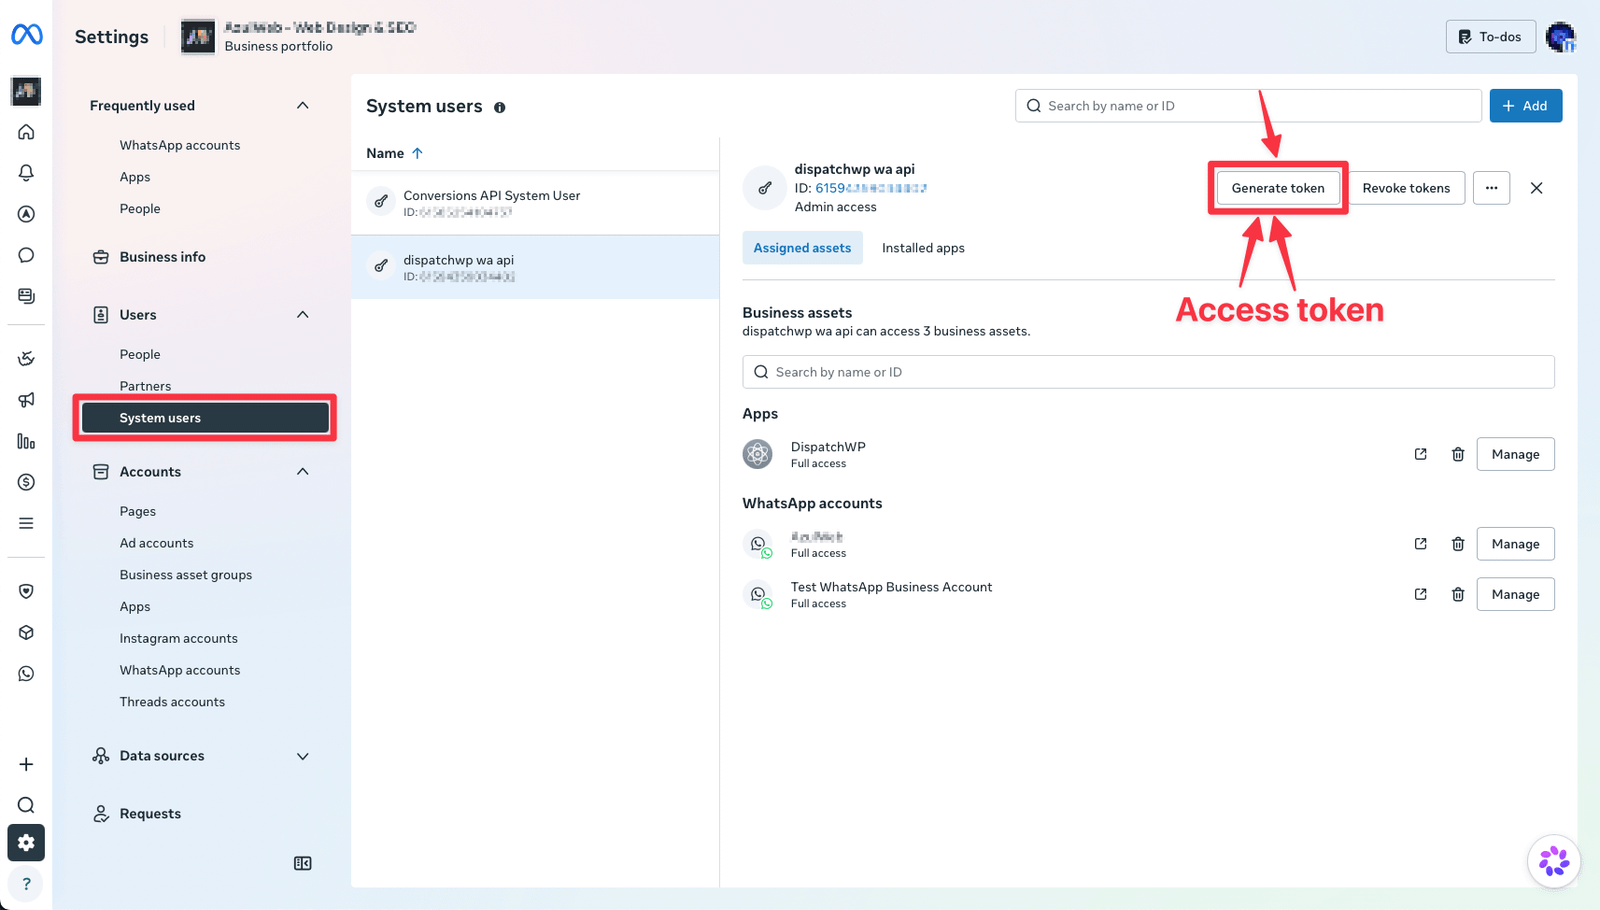
- Go to Business settings → Users → System users and click Add. Give it a name (e.g. dispatchwp wa api) and the Admin role.
- With the system user selected, click Assign assets and give it full control of:
- your app (under Apps), and
- your WhatsApp account (under WhatsApp accounts). Use your real account, not the “Test WhatsApp Business Account” Meta may have created for you.
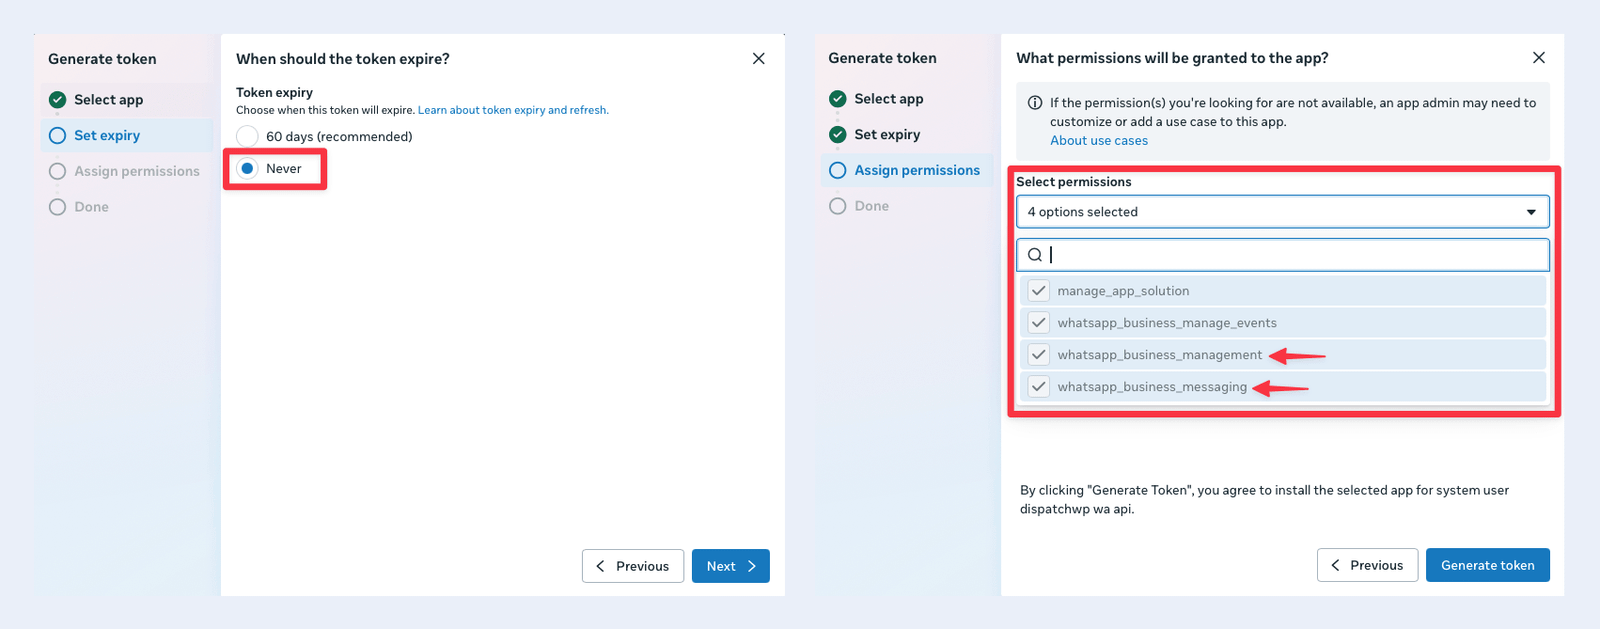
- Click Generate token. Choose your app, set the expiration to Never, and tick both of these permissions:
whatsapp_business_messagingwhatsapp_business_management
- Copy the token right away. Meta only shows it once. If you lose it, generate a new one.
Treat this token like a password. Anyone who has it can send WhatsApp messages as your business.
Step 3: Find your Phone number ID
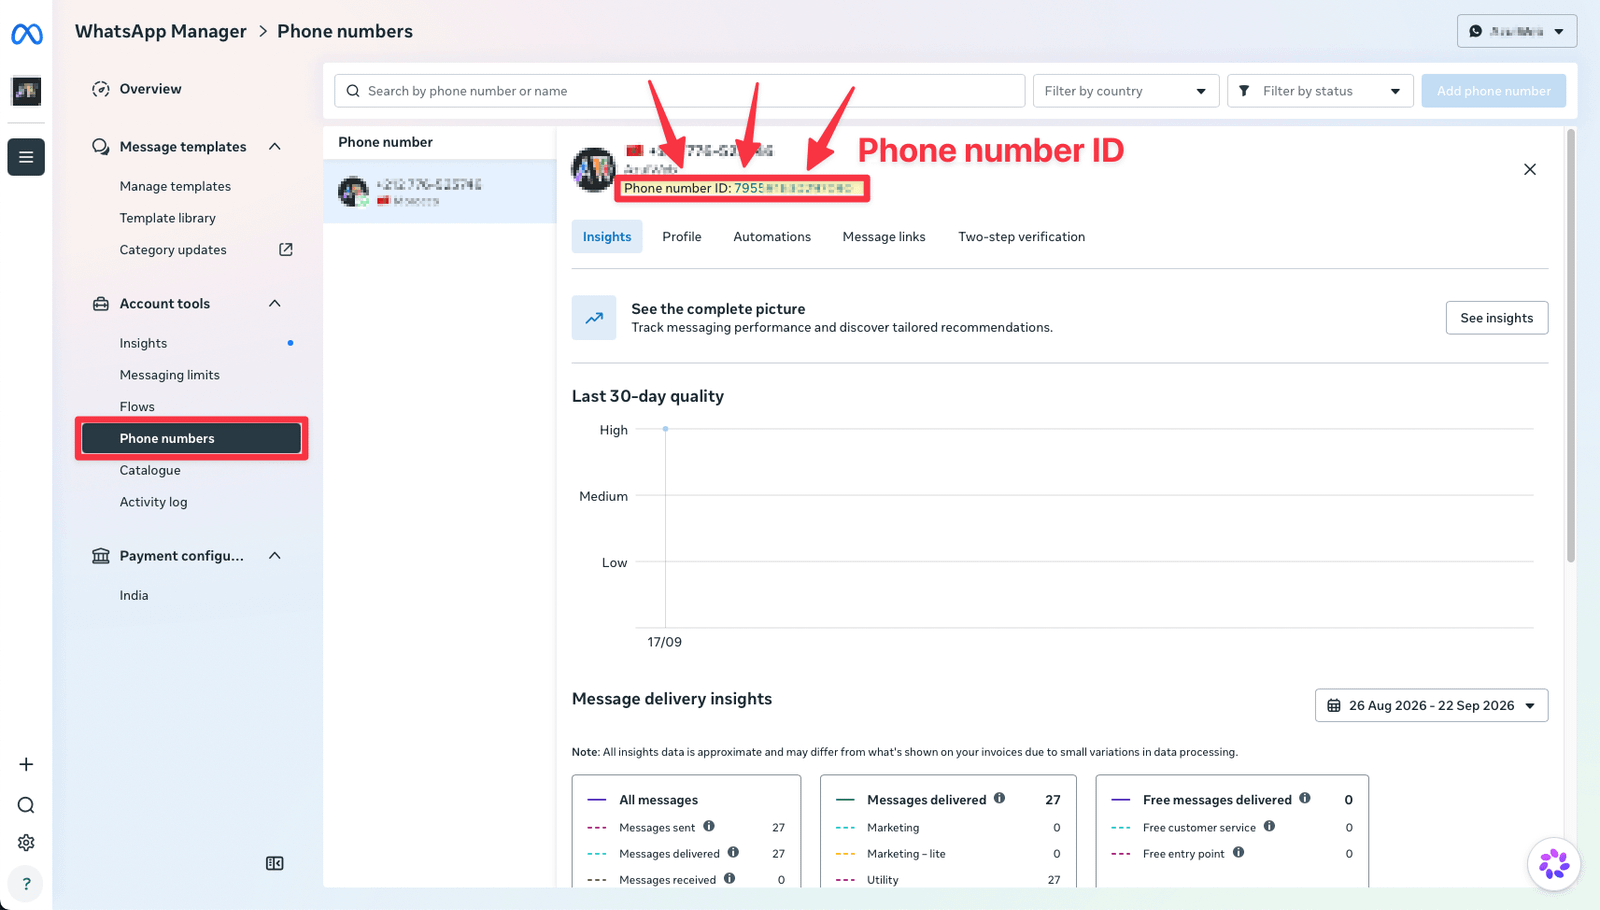
Open WhatsApp Manager → Account tools → Phone numbers and click your number. The Phone number ID is shown under the number. It’s a long ID made up only of digits, and it’s different from the phone number itself.
Step 4: Find your WhatsApp Business Account (WABA) ID
In Business settings → Accounts → WhatsApp accounts, select your account. The ID under its name is your WABA ID.
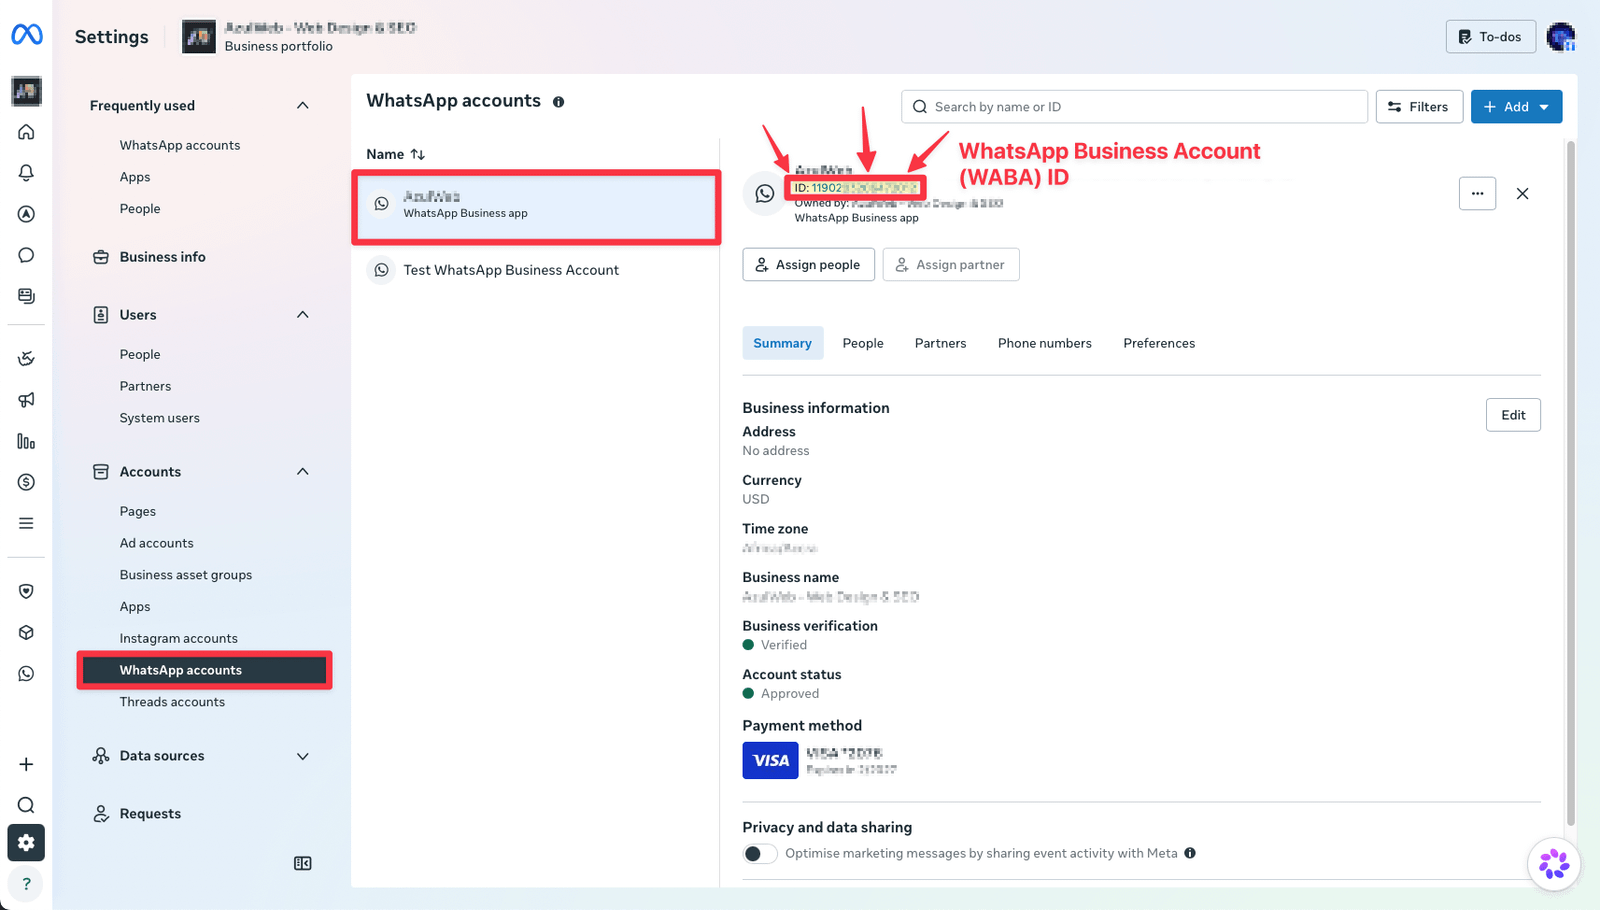
Pro needs this ID to load your approved templates and to switch on delivery-status updates. Don’t skip it.
Step 5: Find your App ID and App secret
The App ID appears in Business settings → Accounts → Apps under your app’s name. It’s also on the app dashboard.
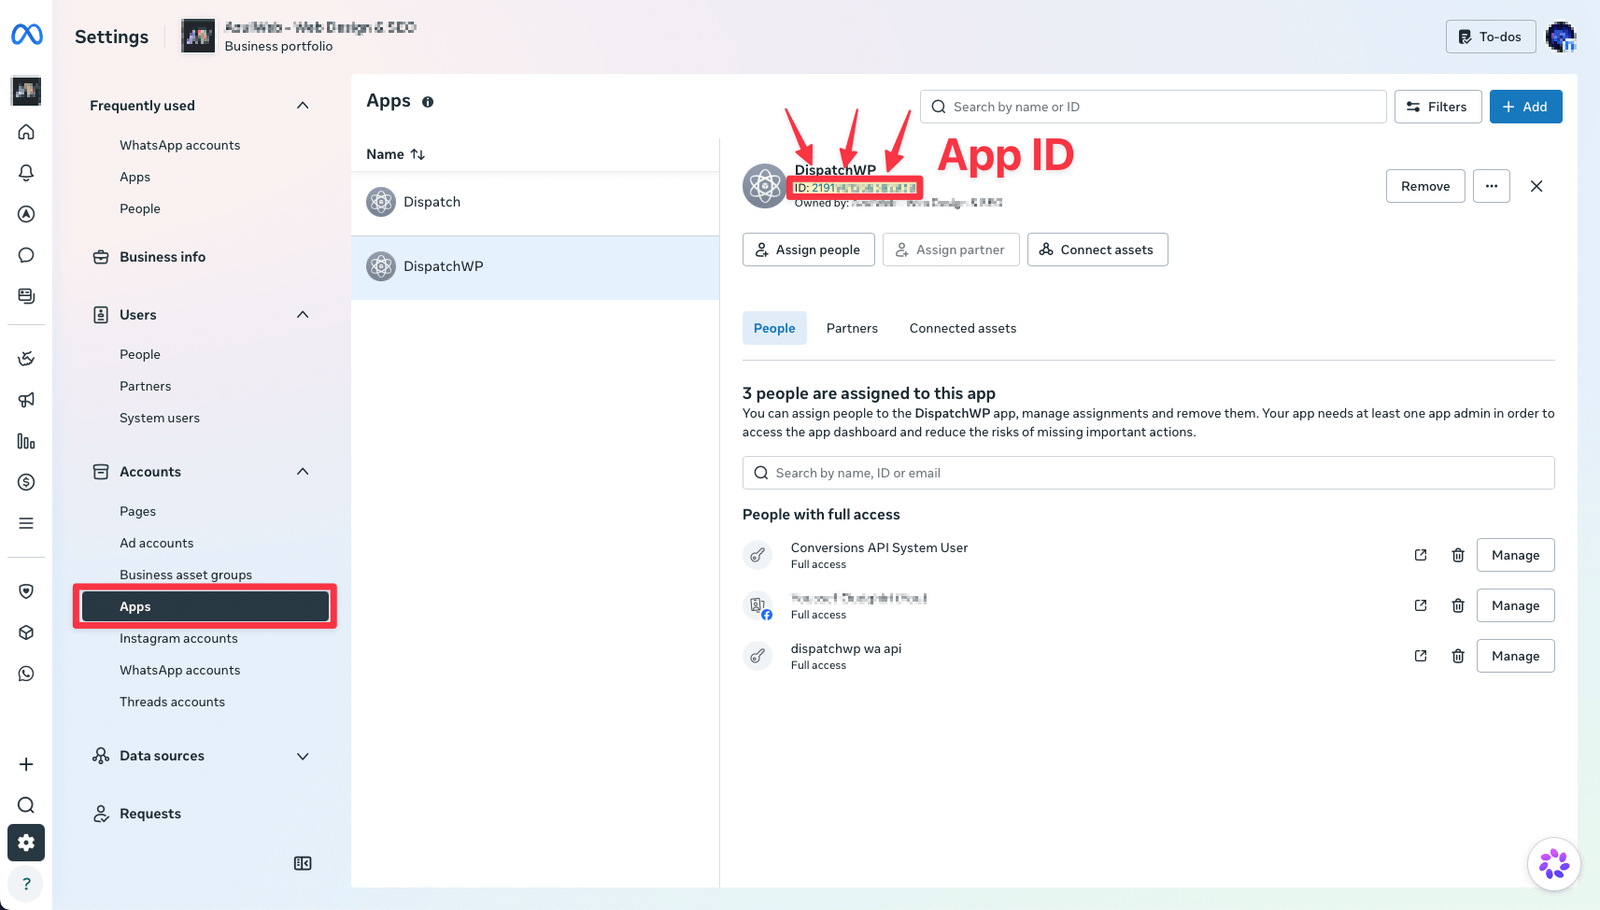
For the App secret, go to developers.facebook.com → My Apps, open your app, then App settings → Basic. Click Show next to App secret. Meta may ask for your Facebook password.
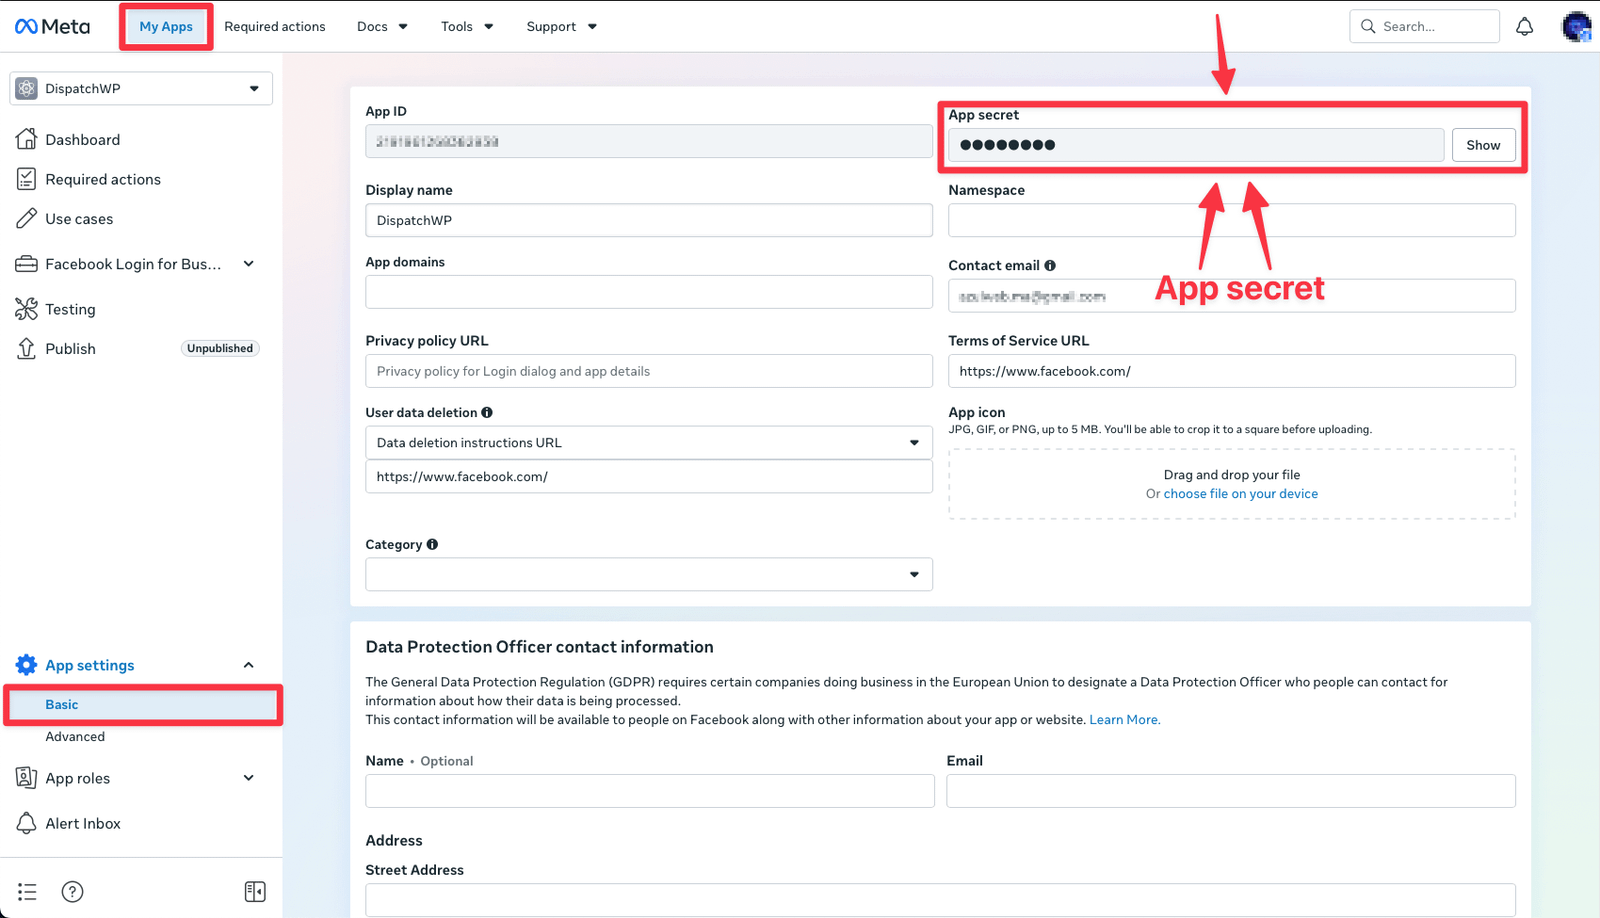
The App secret is what lets Pro confirm that delivery updates really come from Meta. Without it, Pro rejects every delivery update and no delivery statuses appear.
4. Connecting Pro to Meta
- Go to WooCommerce → Settings → WhatsApp Pro (the Meta Cloud API section).
- Paste in the values from the previous section:
- Access token: the System User token.
- Phone number ID
- WhatsApp Business Account (WABA) ID
- App ID
- App secret
- Click Test Connection. You don’t need to save first, because the test uses what’s on the screen.
- Click Save changes.
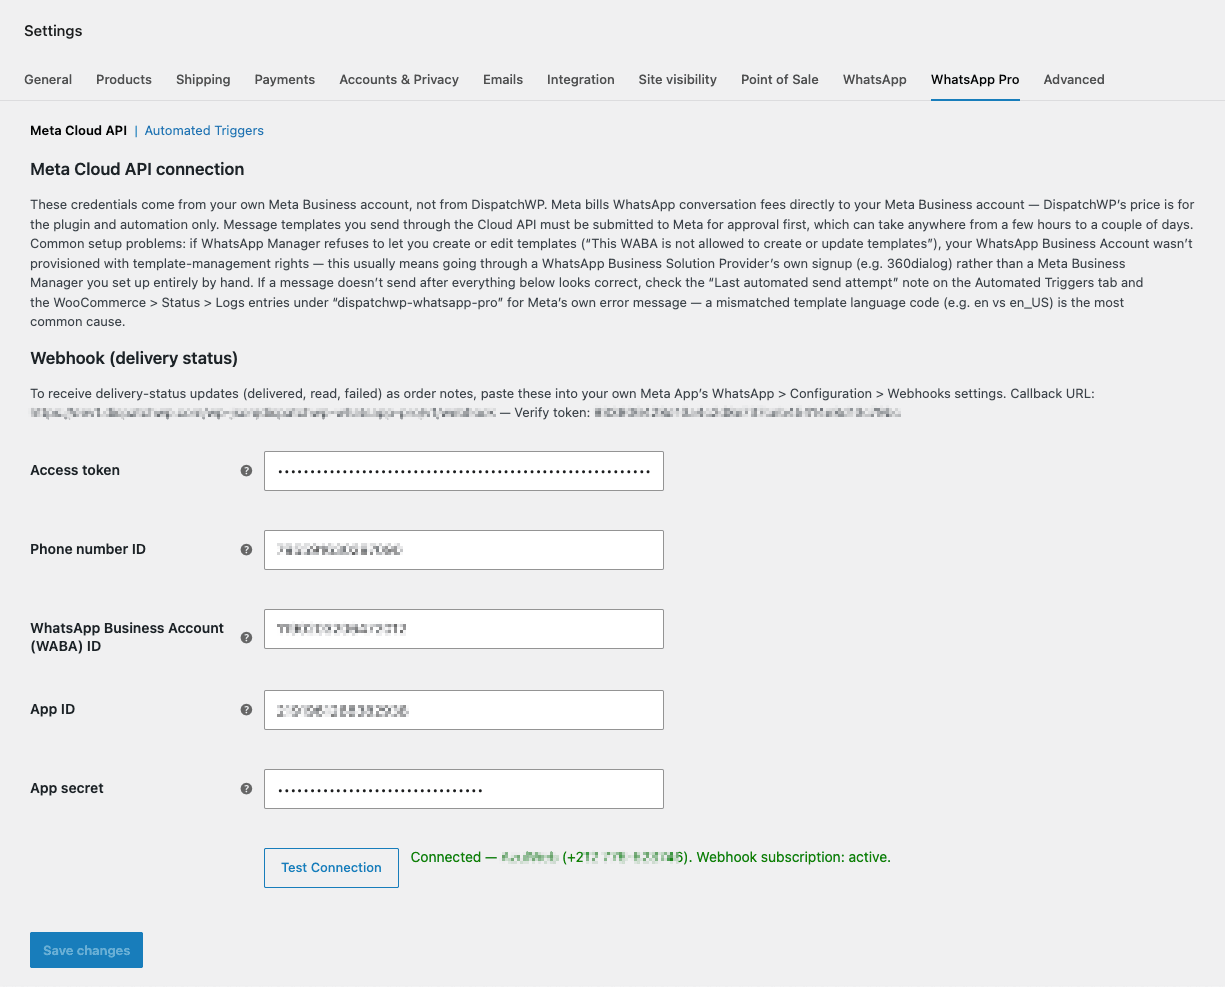
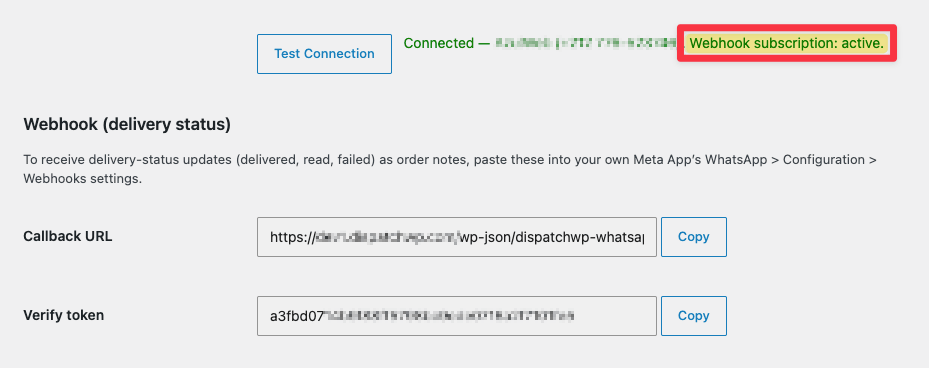
A successful test shows your business name and number in green, for example “Connected — Your Store (+212 6XX-XXXXXX). Webhook subscription: active.”
- The first part, Connected, confirms your token and Phone number ID work.
- The second part, Webhook subscription: active, confirms Pro has linked your WhatsApp Business Account to your app so Meta will send delivery updates. Meta’s own dashboard doesn’t show this step anywhere. Without it, delivery statuses never arrive even when everything else looks right. Pro does it for you each time you run Test Connection with a WABA ID filled in.
If either part fails, the message in red is Meta’s own error text. See Troubleshooting.
5. Delivery status: setting up webhooks
A webhook is how Meta tells your site that a message was delivered, read or failed. Without it, Pro still sends messages, but you won’t see delivery statuses.
- In Pro’s Meta Cloud API section, find Webhook (delivery status). It shows two read-only fields, each with a Copy button: the Callback URL (ending in
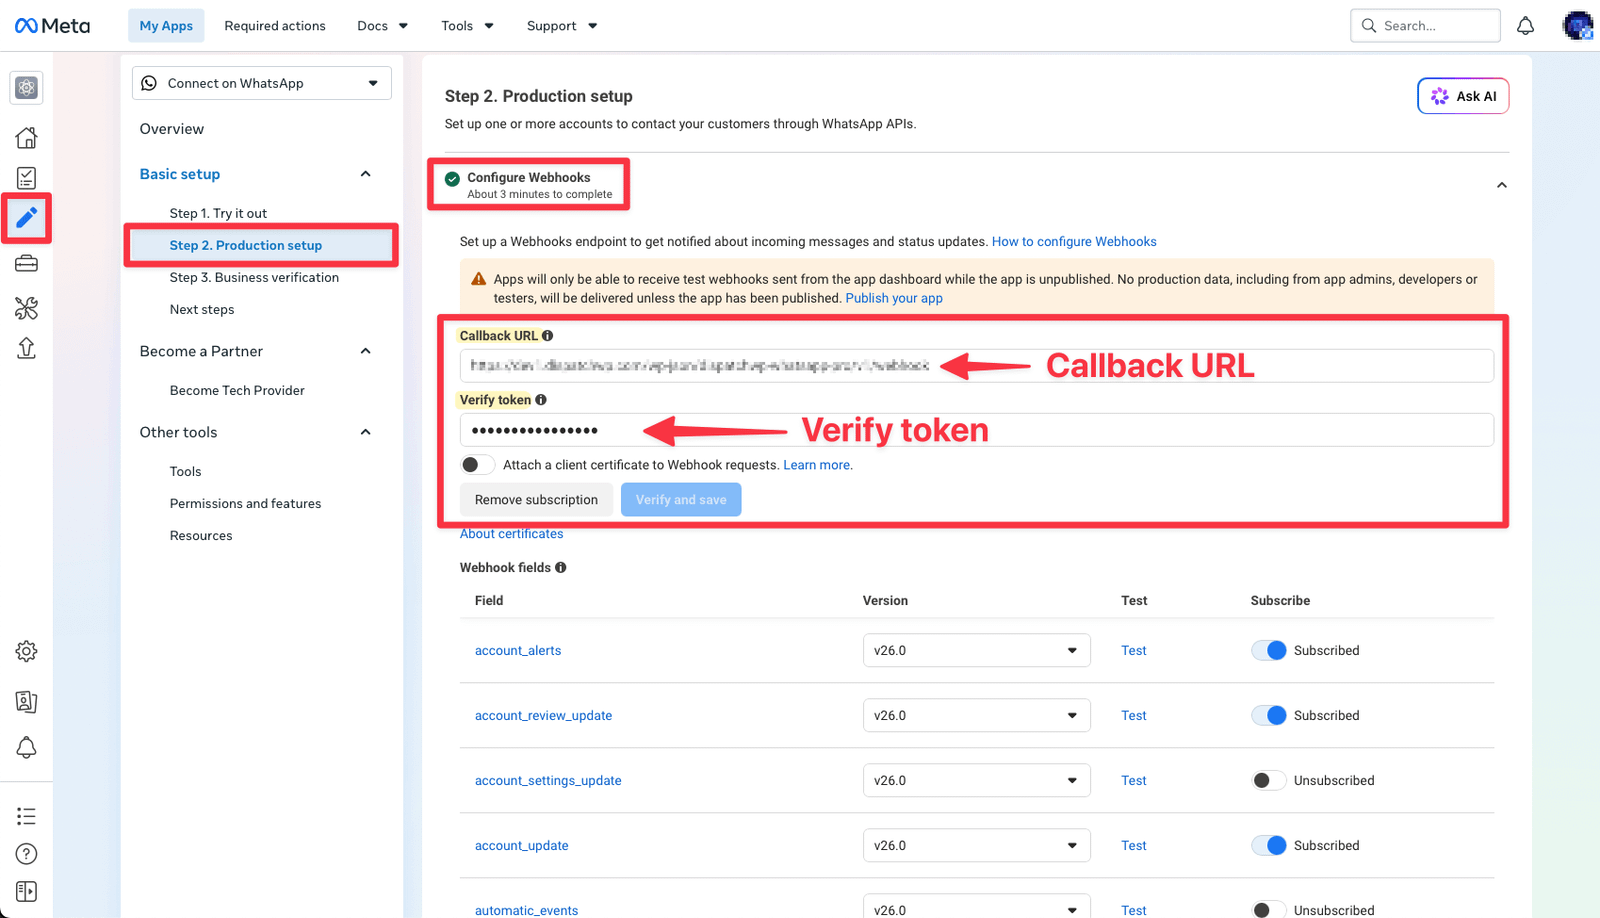
/wp-json/dispatchwp-whatsapp-pro/v1/webhook) and the Verify token. Pro creates the verify token for you. You don’t choose it. - In your Meta app dashboard, open the WhatsApp use case (Connect on WhatsApp) → Basic setup → Step 2. Production setup → Configure Webhooks. You may reach the same screen under WhatsApp → Configuration.
- Copy the Callback URL and Verify token from Pro with their Copy buttons, paste them into Meta, then click Verify and save.
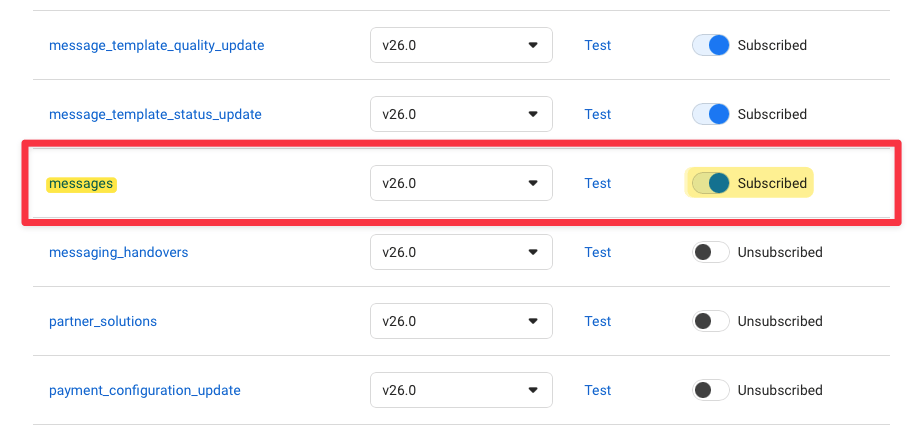
- Under Webhook fields, make sure
messagesis set to Subscribed. Delivery statuses arrive through this field, and so do customers’ replies (see Customer replies). - Back in Pro, click Test Connection again and check that it says Webhook subscription: active.
Publish your app. Meta’s webhook screen warns that an unpublished app only receives test webhooks, not real ones. If your app still shows Unpublished in the app dashboard’s left menu, publish it (Publish in the left menu). Meta may ask for a privacy policy URL and an app icon first.
If “Verify and save” fails: check that your site is reachable from the internet over HTTPS and that nothing blocks /wp-json/. Security plugins, firewalls, “maintenance mode” and password protection can all block Meta. Copy the verify token again without extra spaces.
6. Creating your message templates in Meta
Meta only lets a business start a WhatsApp conversation with a message template it has approved in advance. That’s why automatic messages use templates you create in WhatsApp Manager, not the templates you write in the free plugin’s settings. You’ll need one approved template for each order status you want to message customers about.
Create a template
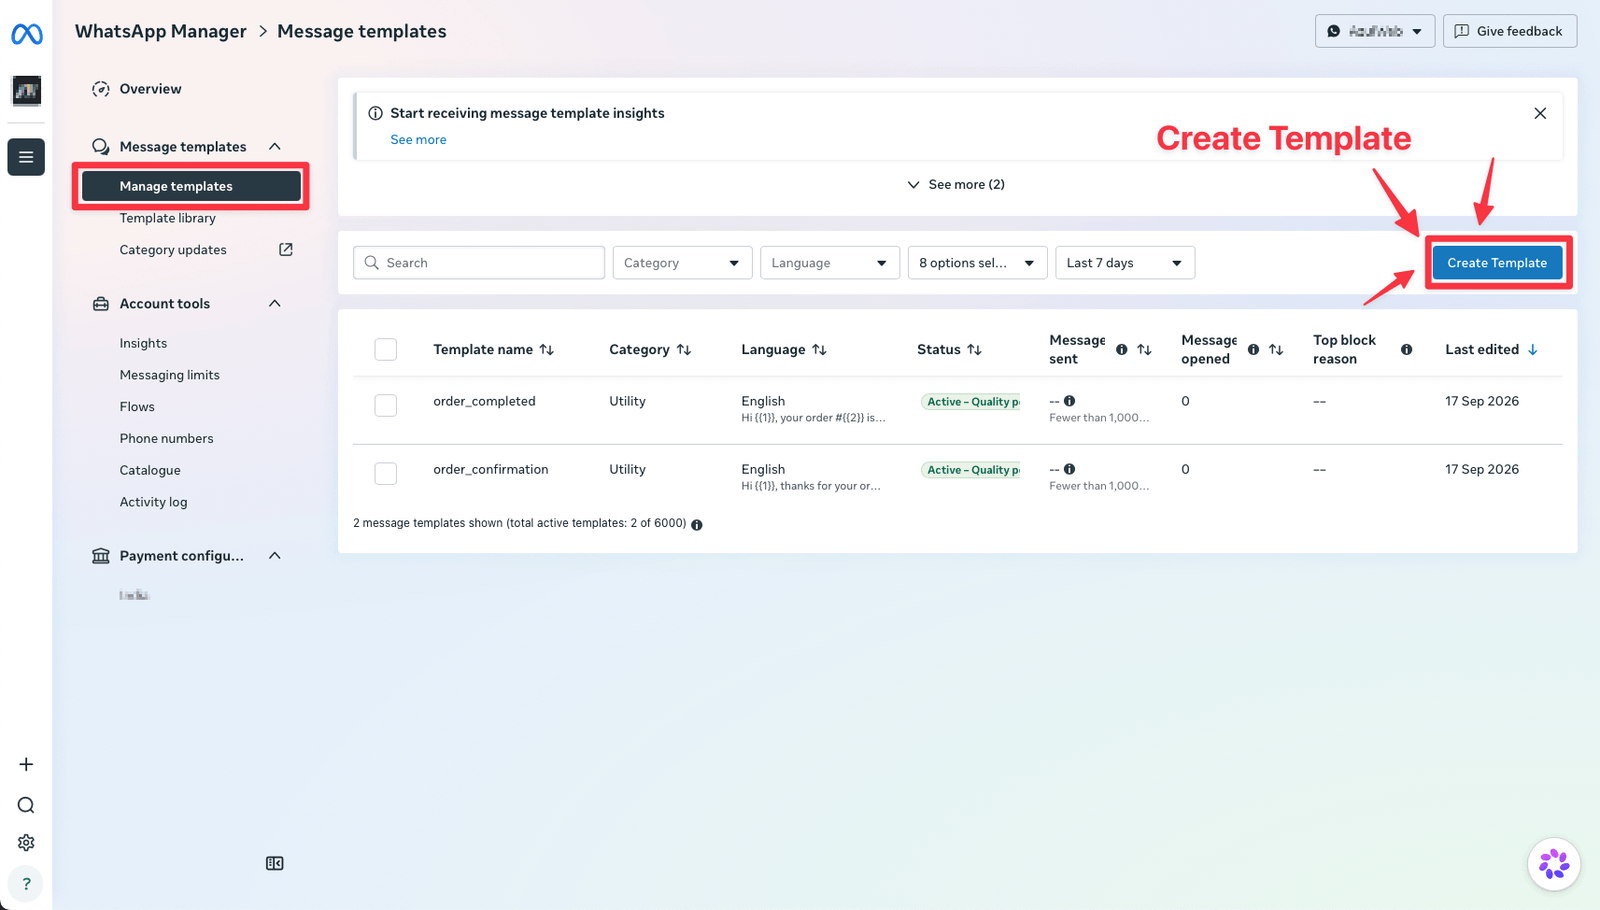
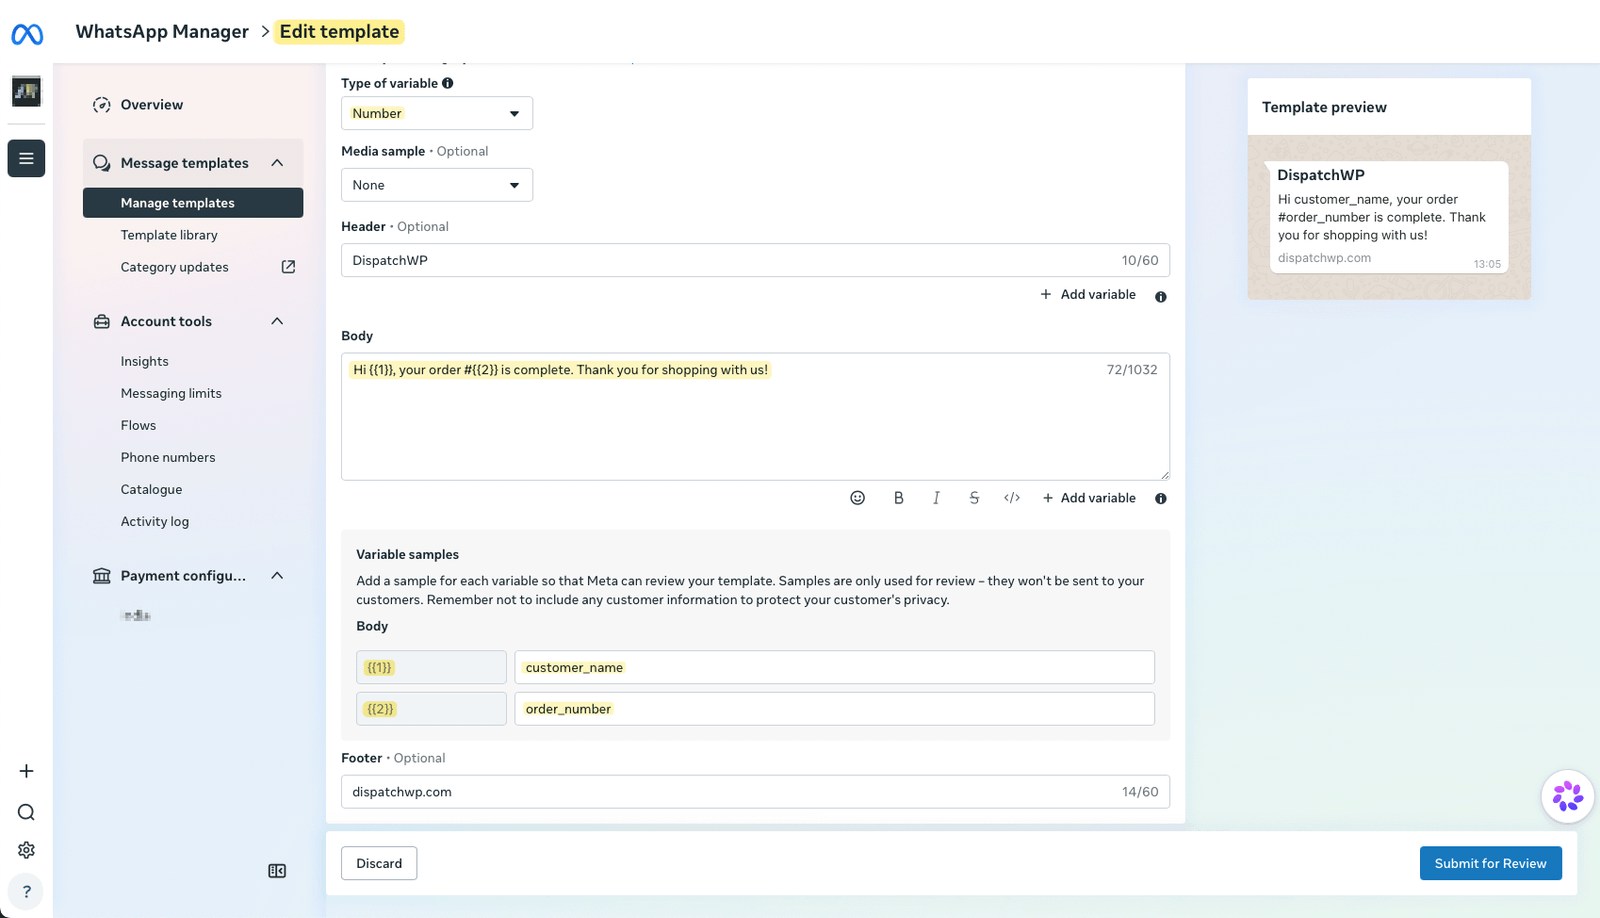
- Open WhatsApp Manager → Message templates → Manage templates and click Create Template.
- Category: Utility. Order updates are utility messages. Don’t choose Marketing.
- Name: lowercase letters, numbers and underscores only, e.g.
order_confirmation. - Language: pick one and note exactly which one. English (
en) and English (US) (en_US) are different languages to Meta. A mismatch is the most common reason a message doesn’t send. - Type of variable: Number. Pro works with numbered variables (
{{1}},{{2}}…). Templates using named variables ({{customer_name}}) won’t appear in Pro’s template picker. - Write the Body using Add variable for each value from the order.
- Fill in Variable samples with realistic examples, such as Sara for a name, 1042 for an order number or 250.00 MAD for a total. Meta reviews these samples. Placeholder-style samples such as customer_name can get a template rejected.
- A Header and Footer are fine as long as they’re plain text with no variables. Pro only fills in body variables. Headers with variables or media, and buttons with variables, aren’t supported.
- Click Submit for Review.
Templates you can copy
These match the order values Pro can fill in. The right-hand column shows what to pick for each variable in Pro later.
order_confirmation(for Processing)
Hi {{1}}, thanks for your order #{{2}}! We’re preparing it now. Total: {{3}}. Items: {{4}}.
Variables:customer_name,order_number,order_total,itemsorder_on_hold(for On hold)
Hi {{1}}, your order #{{2}} is on hold. We’ll update you as soon as it progresses.
Variables:customer_name,order_numberorder_completed(for Completed)
Hi {{1}}, your order #{{2}} is complete. Thank you for shopping with us!
Variables:customer_name,order_number
Avoiding rejection
- Don’t start or end the body with a variable. Put some text before the first variable and after the last one, even just a full stop.
- Keep the wording transactional and about the order. No promotions, discounts or “shop now” wording in a Utility template.
- Don’t use too many variables compared to the amount of normal text.
Waiting for approval
Approval takes anywhere from a few minutes to a couple of days. A template’s status in the list changes to Active once it’s approved. If it’s rejected, WhatsApp Manager shows the reason. Edit the template and submit it again.
“This WABA is not allowed to create or update templates”: some WhatsApp Business Accounts are created without permission to manage templates, and Meta doesn’t offer a way to fix this from your side. The practical workaround is to set up your WhatsApp account through a WhatsApp Business Solution Provider’s own signup, such as 360dialog, instead of a Business Manager you set up entirely by hand.
7. Turning on automatic sending (Automated Triggers)
Go to WooCommerce → Settings → WhatsApp Pro → Automated Triggers. Here you choose which order statuses send a message automatically, and with which template.
The quick way: Load my templates (recommended)
- Make sure your Meta Cloud API settings, including the WABA ID, are saved. This button uses saved values.
- Click Load my templates. Pro fetches your approved templates from Meta and shows how many it loaded.
- Under each order status, a new dropdown appears: — choose a loaded template —. Each option shows the template name, its language code and its number of variables, e.g. order_confirmation (en, 4 variables). Choose one for each status you want to automate.
- Picking a template fills in its name and exact language code for you. It also adds one dropdown per variable, such as {{1}} = customer_name. Set each variable to the order value that belongs in that position.
- Click Save changes.
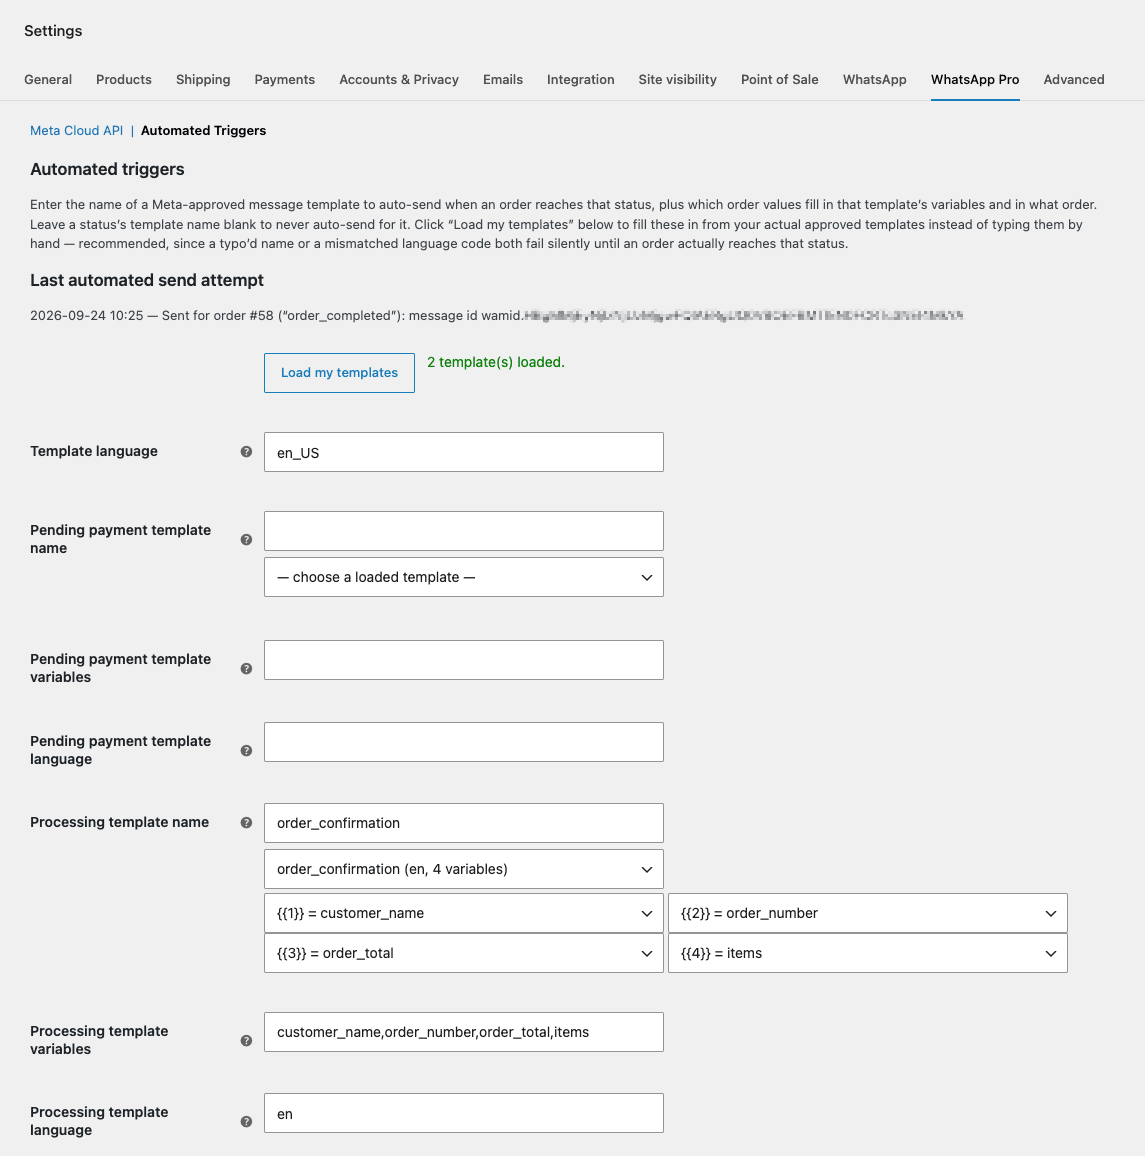
Use the picker instead of typing names by hand. A mistyped template name or the wrong language code doesn’t show an error when you save. It only fails when a real order reaches that status.
The fields, if you’d rather fill them in yourself
Each order status has its own box (for example Processing), with three fields:
- Template name: the template’s exact name in Meta. Leave blank to never send automatically for this status.
- Template variables: the order values that fill
{{1}},{{2}}… in order, separated by commas, e.g.customer_name, order_number, order_total. Type the value names, not the{{1}}markers. Leave blank if the template has no variables. - Template language: the language code this template was approved in, e.g.
enoren_US. Leave blank to use the shared Template language setting at the top of the section (defaulten_US).
Values you can use as variables:
customer_name: billing first and last name.order_numberorder_total: with currency, e.g. 250.00 MAD.order_status: e.g. Processing.tracking_number: empty unless a shipment-tracking plugin provides it. See the free plugin’s guide.items: the ordered products. WhatsApp templates can’t contain line breaks, so Pro sends them on one line separated by semicolons, e.g. 2× Blue T-shirt; 1× Cap.
Last automated send attempt
At the top of the section, Last automated send attempt shows the result of the most recent automatic send. It includes the time (UTC), whether it Sent or Failed, the order number and template, and then either Meta’s message ID or Meta’s exact error message. This is the first place to look when something doesn’t arrive. If you also use Dispatchable Order Verification Pro, its WhatsApp confirmation messages show here too (template dwpv_order_confirmation, or whichever confirmation template you chose there).

8. Sending your first automatic message
- Place a test order using your own phone number as the billing phone, typed in full international format, e.g.
+212612345678. - Move the order to a status you’ve set up, e.g. Processing. Placing a cash-on-delivery order usually does this for you.
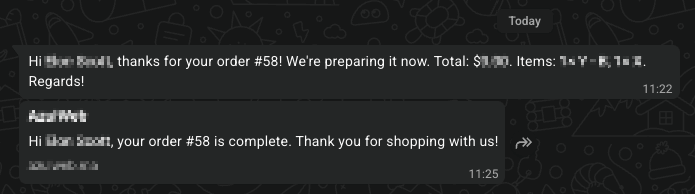
- Within a minute or so, the WhatsApp message should arrive on your phone.
- Reload Automated Triggers and check Last automated send attempt.
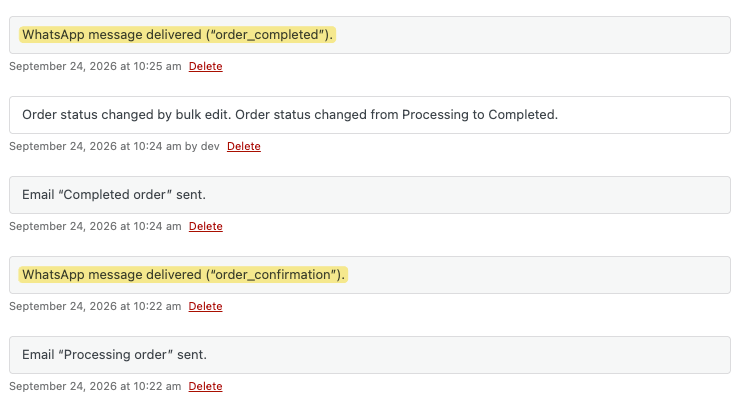
- Open the order. Once Meta confirms delivery, an order note appears: “WhatsApp message delivered (“order_confirmation”).”
9. How sending, retries and order notes work
When a message is sent
- A message is sent each time an order changes to a status that has a template name set. Orders already in that status aren’t messaged when you add a template later.
- If an order goes into the same status twice (for example, Processing → On hold → Processing), the customer gets the message twice.
- Sending runs in the background using WooCommerce’s own task queue (Action Scheduler). It usually happens within a minute. On a site with very little traffic, it can take slightly longer.
- Pro uses the order’s details at the moment of sending, not the moment of the status change. Edits made in between are included.
- An order with no billing phone is skipped. Nothing is sent and nothing is logged.
Customer phone numbers
Pro sends to the order’s billing phone as the customer typed it. Meta needs the full international number. A number typed in local format, such as 0612345678, may fail or not reach the customer. The most reliable approach is for customers to enter their number with the country code (+212…). You could, for example, say so in your checkout’s phone field label or help text.
Automatic retries
If a send fails because of something temporary, such as a network problem, Meta rate-limiting you, or an error on Meta’s side, Pro tries again automatically. The second attempt is about 1 minute later and the third about 15 minutes after that, for 3 attempts in total.
A failure caused by your setup (wrong template name, wrong language, bad token, missing permission) is not retried, because retrying wouldn’t help. It’s reported straight away so you can fix it.
Last automated send attempt only updates once there’s a final result, so it doesn’t show “Failed” while a retry is still pending. A message that failed all three attempts shows “(after 3 attempts)”.
Order notes
When Meta reports back, Pro adds a note to the order:
- WhatsApp message delivered (“template”).
- WhatsApp message read by the customer (“template”). This only appears if the customer has read receipts turned on.
- WhatsApp message delivery failed (“template”): [Meta’s reason]
“Sent” doesn’t create a note, to keep order notes readable. It still appears in the Delivery Log.
Technical logs
Every send, retry and error is also written to WooCommerce → Status → Logs under the source dispatchwp-whatsapp-pro. This is where to look, and what to share with support, if something isn’t working. Queued and retried sends appear under WooCommerce → Status → Scheduled Actions (search for dispatchwp_whatsapp_pro).
10. The WhatsApp Delivery Log and CSV export
Go to WooCommerce → WhatsApp Delivery Log. It shows automatic messages sent by Pro alongside manual “Notify Customer” sends from the free plugin, newest first.
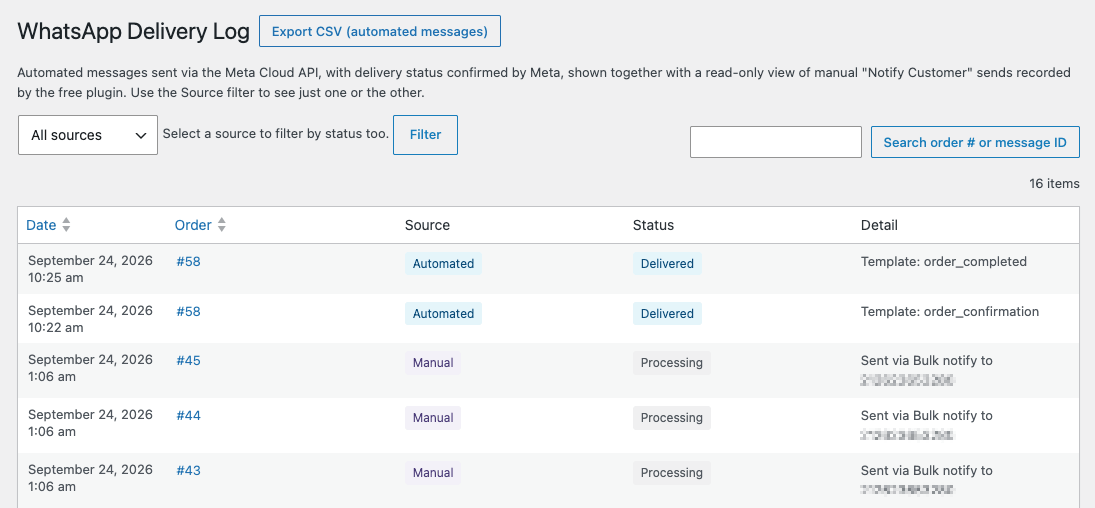
Columns:
- Date
- Order: links to the order.
- Source: Automated (sent by Pro, including Dispatchable Order Verification Pro’s WhatsApp confirmation messages) or Manual (a Notify Customer click in the free plugin).
- Status: for automated messages, the delivery status confirmed by Meta (Sent, Delivered, Read, Failed). For manual sends, the order’s status when it was sent.
- Detail: the template name, and Meta’s error for failed messages. For manual sends, whether it came from a single order or a bulk batch, and the number.
Filtering and search:
- Source: All sources, Automated only or Manual only.
- Status: appears after you choose a source. Automated shows delivery statuses and Manual shows order statuses. They’re kept separate because “Failed” means something different in each.
- Search: by order number, or by Meta message ID for automated messages.
Export CSV (automated messages) downloads the automated messages matching your current filters, up to 5,000 rows. Columns are Order ID, Template, Status, Sent at (UTC), Last updated (UTC), Message ID and Error. Manual sends aren’t included in the export.
11. Using Pro alongside the free plugin’s features
Everything in the free plugin keeps working with Pro active:
- Product, cart and order WhatsApp buttons for customers.
- The one-click and bulk Notify Customer actions, handy for one-off messages or statuses you haven’t automated.
- The free plugin’s own WhatsApp Log.
The two kinds of templates are separate:
- The free plugin’s Templates (WooCommerce → Settings → WhatsApp → Templates) are used for manual Notify Customer messages.
- Pro’s automatic messages use the Meta-approved templates you set up under Automated Triggers.
If you automate a status and also click Notify Customer on the same order, the customer gets both messages.
12. Using Pro with Dispatchable Order Verification Pro
Since version 0.3.0, other DispatchWP plugins can send WhatsApp messages through Pro’s existing Meta connection. They can also receive customers’ replies. The first to use this is Dispatchable Order Verification Pro (0.3.0 or newer).
Verify Pro sends each new cash-on-delivery order that’s awaiting confirmation one WhatsApp message with Confirm and Cancel buttons. The customer’s tap records their answer on the order.
What you need to do in this plugin
Nothing new. Verify Pro uses the same WhatsApp number, Meta account, access token and webhook you already set up here. Just make sure that:
- Test Connection shows Connected and Webhook subscription: active;
- the
messageswebhook field is Subscribed in your Meta app. The customer’s taps arrive through it.
You create and choose the confirmation template in Verify Pro, not here. Verify Pro can create it in your WhatsApp Business account for you. Its WhatsApp confirmation messages don’t use your Automated Triggers and don’t change them.
Where Verify Pro’s messages show up here
- In the WhatsApp Delivery Log, as Automated rows with the confirmation template’s name, and in the CSV export.
- As order notes when Meta reports them delivered, read or failed, just like your own automatic messages.
- In Last automated send attempt and in WooCommerce → Status → Logs (
dispatchwp-whatsapp-pro).
Meta bills these messages to your Meta Business account like any other template message.
Customer replies
Since version 0.3.0, Pro also records the replies customers send to your business number. That includes button taps and typed messages. Replies are kept on your site for 90 days, then deleted automatically. They’re included in WordPress’s personal-data export and erase tools (Tools → Export / Erase Personal Data), as “WhatsApp replies”.
There’s no screen to read replies in WordPress, and Pro doesn’t answer them. They’re there so that DispatchWP plugins such as Verify Pro can act on a customer’s button tap. You keep replying to customers in WhatsApp as before.
13. Deactivating or deleting Pro
- Deactivating stops automatic sending straight away and keeps your settings and Delivery Log. It also stops Dispatchable Order Verification Pro’s WhatsApp confirmations, which then go by email instead.
- Deleting Pro from the Plugins screen removes Pro’s settings, trigger setup, Delivery Log data and stored customer replies. The free plugin and its WhatsApp Log aren’t affected.
- Your Meta account, templates and access token aren’t touched. If you’re done with the integration for good:
- remove the webhook in your Meta app (Remove subscription), and
- revoke the System User token (Revoke tokens).
14. Troubleshooting
Start with Last automated send attempt (Automated Triggers) and WooCommerce → Status → Logs → dispatchwp-whatsapp-pro. Most problems show Meta’s exact error message in one of those two places.
An order changed status but no message was sent, and there’s no error anywhere
- Is the template name for that exact status filled in and saved? A blank template name means “don’t send for this status” and doesn’t show an error. Check that you set it on the status the order actually moved to.
- Does the order have a billing phone? Orders without one are skipped. You can require a phone number at checkout in the free plugin (WooCommerce → Settings → WhatsApp → General).
- Are the Access token and Phone number ID saved? Without them, nothing is queued.
- Check WooCommerce → Status → Scheduled Actions for a pending or failed
dispatchwp_whatsapp_pro_send_notificationaction. If actions stay “Pending”, WordPress’s scheduled tasks (WP-Cron) aren’t running on your site. Ask your host.
Error #132001: “Template name does not exist in the translation”
The language code doesn’t match the language your template was approved in. The most common case is en_US set in Pro while the template is en (shown in WhatsApp Manager simply as “English”). Use Load my templates and pick the template again, which fills in the exact code. Or set that status’s Template language field yourself. Also check the template name for typos.
Error #132000 or #132018: a problem with the template’s parameters
- The number of variables in Pro doesn’t match the template. Make sure that status’s Template variables field lists exactly as many values as the template has
{{n}}markers. - The template uses a header with a variable, a media header or a button with a variable. Pro only fills in body variables. Recreate the template with a plain-text header and no variable buttons.
Multi-line item lists, which WhatsApp templates don’t accept, are converted to one line automatically, so orders with several products are fine.
Test Connection fails
- Invalid or expired token: you may have used the temporary token from the app’s API Setup page. Generate a System User token set to Never expire (Step 2).
- Object does not exist / unsupported request: the Phone number ID is wrong. Make sure it’s the ID, not the phone number itself, and that it belongs to your real WhatsApp account rather than the test account.
- Permissions error: the System User doesn’t have full control of the app and WhatsApp account, or the token is missing
whatsapp_business_messaging/whatsapp_business_management. Assign the assets and generate a new token.
“Connected”, but “Webhook subscription failed”
Your credentials work, but Pro couldn’t link your WhatsApp Business Account to your app for delivery updates. Check that the WABA ID is correct, i.e. the ID of your real WhatsApp account, and that your System User has full control of that account. Then run Test Connection again.
Messages send, but no delivery statuses or order notes appear
- Run Test Connection with the WABA ID filled in and confirm Webhook subscription: active. This is the most common cause.
- In your Meta app’s webhook settings, check that the callback URL and verify token match Pro’s, and that the
messagesfield is Subscribed. - Check that your Meta app is published.
- Check that the App secret in Pro matches the app that owns the webhook. If the logs show “Rejected an incoming webhook event: invalid or missing X-Hub-Signature-256 signature”, the App secret is wrong or missing.
- If the logs show nothing at all after a send, Meta isn’t reaching your site. Check that the site is public HTTPS and that no firewall or security plugin blocks
/wp-json/.
“Save your Meta Cloud API connection first…” when clicking Load my templates
Load my templates uses saved settings. Fill in the Access token and WABA ID on the Meta Cloud API section and click Save changes, then try again.
My template doesn’t appear after Load my templates
- Only approved templates are listed. Check the status in WhatsApp Manager.
- Templates using named variables (
{{customer_name}}) are left out. Pro tells you how many were skipped. Recreate the template with Type of variable: Number. - Check you’re looking at the right WhatsApp account. The WABA ID in Pro decides which account’s templates are loaded.
“This WABA is not allowed to create or update templates”
See Waiting for approval above. This is a limit on your WhatsApp Business Account on Meta’s side, and signing up through a solution provider such as 360dialog is the usual workaround.
The customer didn’t receive the message / “invalid recipient”
- Check the order’s billing phone includes the country code (
+212…). See Customer phone numbers. - The number may not be on WhatsApp.
- Your account may have reached its daily messaging limit. Check WhatsApp Manager → Account tools → Messaging limits.
Meta says my payment method is missing, or my account is restricted
Add or fix the payment method on your WhatsApp Business Account in Business settings. Meta won’t deliver template messages without one.
Dispatchable Order Verification Pro says WhatsApp isn’t ready
Verify Pro’s WhatsApp channel health check needs this plugin at 0.3.0 or newer, active, with a working connection. Update Pro if needed, then run Test Connection here and check for Connected and Webhook subscription: active. If messages go out but taps are never recorded in Verify Pro, follow Messages send, but no delivery statuses or order notes appear above, because taps use the same webhook.
“Dispatchable Order Messaging for WooCommerce Pro is not running.”
The free plugin is missing, inactive or out of date, or WordPress/WooCommerce is below the minimum version. The notice names which. Install or activate the free plugin, or update, and the notice goes away.
15. FAQ
Do I need a Meta Business account?
Yes. Automatic sending uses Meta’s official WhatsApp Cloud API through your own Meta account. That’s the key difference from the free plugin, which needs no Meta account at all.
Who pays for the WhatsApp messages?
Meta bills message fees directly to your Meta Business account. Your DispatchWP license covers the plugin only.
Can I use my current WhatsApp number?
Your number has to be registered with the WhatsApp Cloud API. What happens to a number already in use on the WhatsApp or WhatsApp Business app depends on Meta’s current options, which Meta explains when you add the number. If you want to keep using your current number normally on your phone, consider a separate number for automatic messages.
Does Pro replace the free plugin?
No. Pro requires the free plugin and adds automatic sending on top. The free plugin’s buttons, manual Notify Customer actions and templates all keep working.
Can customers reply?
Yes, in WhatsApp on your business number, and you answer them from wherever that number is used (WhatsApp Manager, the WhatsApp Business app or your provider’s inbox). Pro records replies for 90 days (see Customer replies), but it doesn’t include a chat inbox inside WordPress.
Can I send marketing or promotional broadcasts?
No. Pro sends order updates triggered by order status changes. Meta treats promotional messages as a separate category with its own rules, and it isn’t part of this plugin.
Does my message data go through DispatchWP’s servers?
No. Messages go directly from your site to Meta, and delivery updates go directly from Meta to your site.
Does it work with Dispatchable Order Verification Pro?
Yes, from version 0.3.0 of both plugins. Verify Pro sends its WhatsApp confirmation messages through this plugin’s connection, with nothing extra to set up here. See Using Pro with Dispatchable Order Verification Pro.
Does it work with HPOS?
Yes, and with legacy order storage.
What if I can’t get Meta’s side working?
Contact support. We’ve been through the common Meta setup problems ourselves and can usually point to the fix. Pro also comes with a 14-day money-back guarantee on your first purchase.
Still stuck?
Pro or account question? Reach support from your account or email support@dispatchwp.com. Include the text of Last automated send attempt and any dispatchwp-whatsapp-pro log lines, with your access token and App secret removed. Free plugin question? Ask on the WordPress.org support forum. Anything else, get in touch.